
I spend a lot of time in Visual Studio Code, so when I heard Microsoft released an official AI Toolkit for it, I had to try it out. Not another autocomplete plugin or chat assistant, this one promised tools to actually build, test, and fine-tune AI models inside the editor.
What I found was powerful.
The VS Code AI Toolkit isn’t trying to replace GitHub Copilot. Instead, it helps you build with AI. You get access to models, a playground to test prompts, tools to create multi-step agents, and options to fine-tune or deploy, all in the same place you write code. If you’re building AI-powered apps or experimenting with models, this extension might save you a ton of time.
In this article, I’ll walk you through what the AI Toolkit can do, what it’s like to use it, and who I think it’s perfect for. If you’re curious about where AI fits into your dev workflow, this is worth a look.
What Is the VS Code AI Toolkit?
The AI Toolkit is a Visual Studio Code extension from Microsoft that brings AI model development into the same space where you write your code. It gives you direct access to a growing catalog of models, from OpenAI, Anthropic, Google, and Microsoft’s own Phi-3 to explore, test, and customize.
Once I installed it, I was greeted with a new sidebar inside VS Code. That’s where you’ll find everything: the Playground for prompt testing, the Model Catalog, tools to build agents, and options to run evaluations or fine-tune small models.
What stood out to me is how practical the setup is. I could load up a model, enter prompts, change parameters like temperature and token limit, and get responses instantly. You can also compare responses from different models side-by-side, which is helpful when you’re deciding which one fits your use case.
If you’re working on anything that involves prompts or language models, this toolkit gives you the foundation to start experimenting right inside your editor. It doesn’t try to guess what you’re coding; it gives you the tools to build AI features on your own terms.
Why Microsoft built it
Before trying the AI Toolkit, I wondered why Microsoft would release something like this when Copilot already exists. But after using it, it became clear: this extension solves a different problem entirely.
Here’s what I think Microsoft is trying to do with the AI Toolkit:
- Bring everything into one place: Instead of juggling browser-based playgrounds, terminal scripts, and API dashboards, the AI Toolkit lets you do it all inside VS Code, including prompt testing, model comparisons, agent building, and more.
- Support real AI development workflows: It’s not just about writing code faster. It’s about building tools with AI, like custom agents, summarizers, or chat assistants, using real model integration.
- Make smaller models easier to use: Microsoft’s been investing in efficient models like Phi-3. This toolkit makes it easier to test and fine-tune them, especially for people working on resource-limited setups or local projects.
- Connect to Azure without friction: If you’re deploying to the cloud or building for scale, the toolkit ties in naturally with Microsoft’s AI infrastructure. That makes sense if you’re already using Azure for hosting or app development.
In short, the AI Toolkit is Microsoft’s answer to developers who want more than just code suggestions. It’s for people building AI-driven features, workflows, and full apps, without bouncing between a dozen tools to get there.
Key features of the AI Toolkit
These are the core tools that make up the AI Toolkit. I used each one while testing, and here’s what they actually do:
- Model Catalog: This is where everything starts. I could scroll through a list of available models from OpenAI, Anthropic, Google, Microsoft, and more. Some ran in the cloud, others locally through Ollama. The catalog made it easy to compare options and switch between them based on what I needed.
- Playground: This is the hands-on testing area. I used it to send prompts, adjust model settings (like temperature and max tokens), and view results immediately. It’s simple, visual, and saves responses so I could track what worked and what didn’t.
- Side-by-Side Model Comparison: One feature I didn’t expect, but really appreciated, was the ability to run the same prompt across different models at once. It helped me see which models were more consistent, more accurate, or better suited for the task I had in mind.
- Agent Builder: With this, I could create multi-step instructions that a model follows, almost like giving it a small job description. It’s great for setting up workflows where the model needs to use tools, follow logic, or stick to a certain format.
- Bulk Run: This came in handy when I wanted to test several prompts at once. I could paste in a list, select a model, and run them all together. It’s a smart way to check edge cases, QA your prompts, or prepare datasets for evaluation.
- Fine-Tuning Interface: The toolkit supports fine-tuning smaller models like Phi-3. I could load in a dataset and walk through the steps without writing custom training scripts. It’s not for huge models, but it’s solid if you’re working with something lightweight and specific.
- Deployment Tools: Once I had something working, I could export it or prep it for deployment. The options aren’t overly complex, but they’re there if you want to take your project to production, especially with Azure integrations.
Each of these tools builds on the others. You start by picking a model, test it in the Playground, refine it with Bulk Run or fine-tuning, build behavior with Agent Builder, and then ship it. Having all of that in one place is what makes this extension stand out.
How to get started with the AI Toolkit extension in VS Code
If you’re new to this extension, don’t worry, I’ll walk you through exactly how I got it working from a fresh setup. Here’s what to do:
Step 1: Install the AI Toolkit Extension
- Open Visual Studio Code.
- On the left sidebar, click the Extensions icon (or press Ctrl + Shift + X).

- In the search bar at the top, type: AI Toolkit for Visual Studio Code
- Look for the official one by Microsoft (you’ll see their name under the title).
- Click Install.
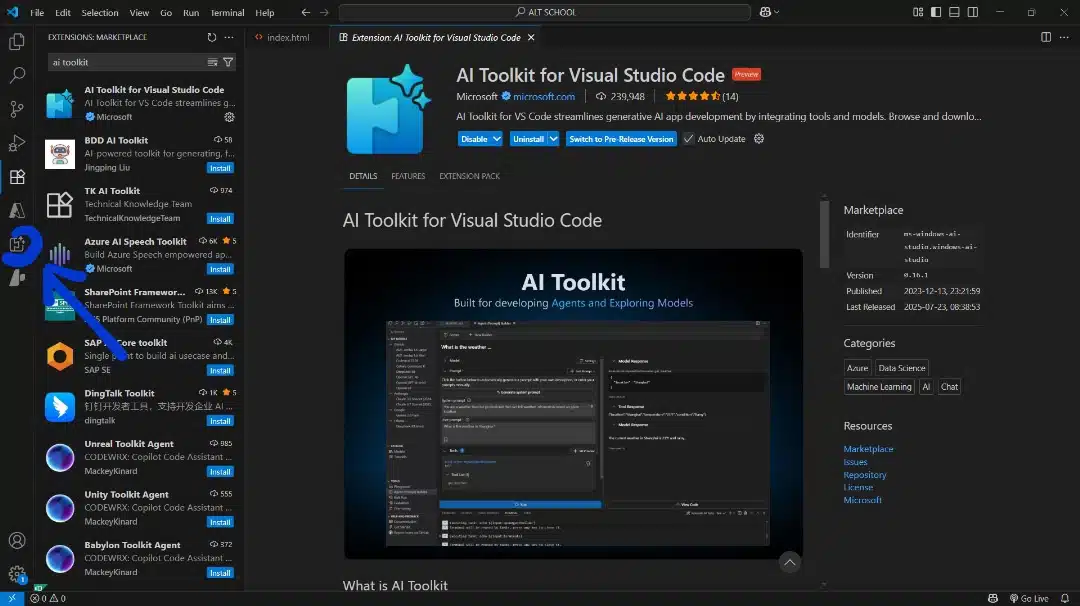
Once it’s installed, you’ll see a new icon on the Activity Bar. It looks like a little spark or starburst; that’s the AI Toolkit panel.
Step 2: Open the Toolkit Panel
- Click the new AI Toolkit icon in the sidebar.
- You’ll land on the Welcome screen, where you can see tools like:
- Playground
- Model Catalog
- Agent Builder
- Evaluation tools
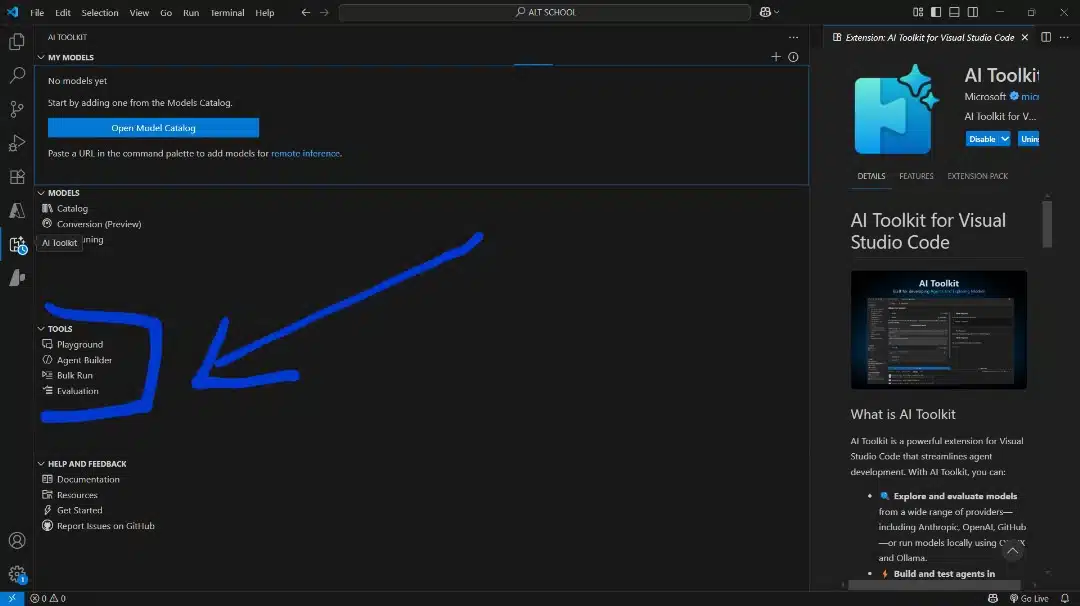
Each of these can be opened as a separate tab inside VS Code.
Step 3: set up a model
To do anything meaningful, you need to load a model. Here’s how I did it:
- Click “Model Catalog” from the Toolkit sidebar.
- Browse the list of available models. You’ll see names like:
- Deepseek-R1
- OpenAI GPT-4.1
- Azure OpenAI
- Claude (Anthropic)
- Gemini (Google)
- Phi-4(Microsoft)
- Local models (via Ollama)
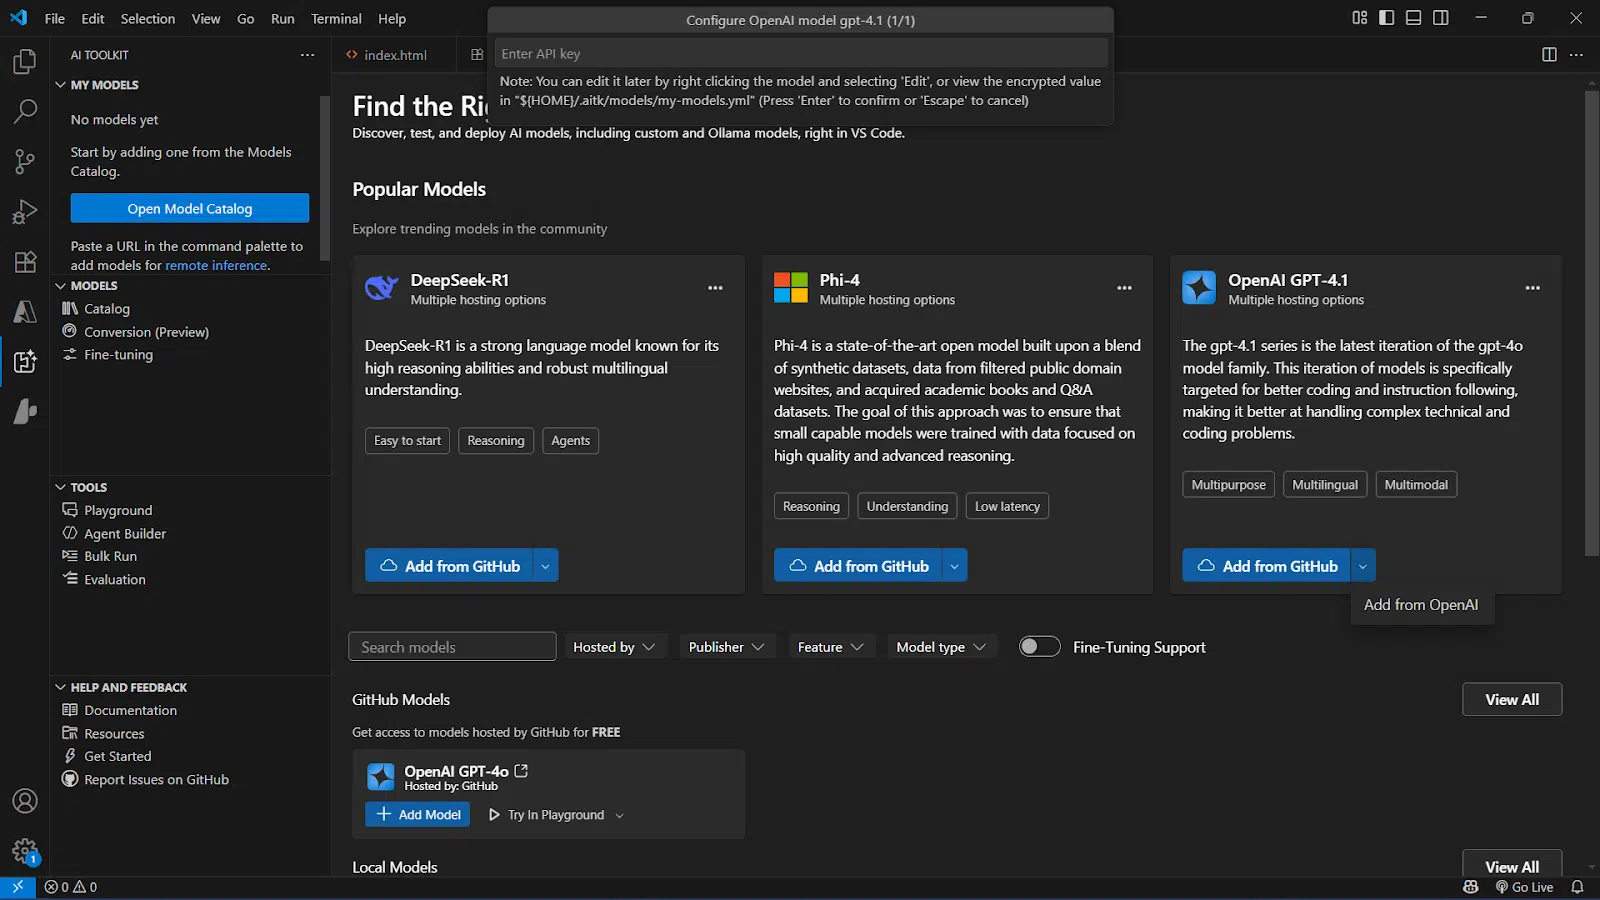
- Choose one. Let’s say you pick OpenAI GPT-4.
- Click on the downward arrow “Add from OpenAI” on the card.
- You’ll be asked to enter your API key.
- If you don’t have one, go to platform.openai.com/account/api-keys to create it.
- Paste your key into the field and click Save.
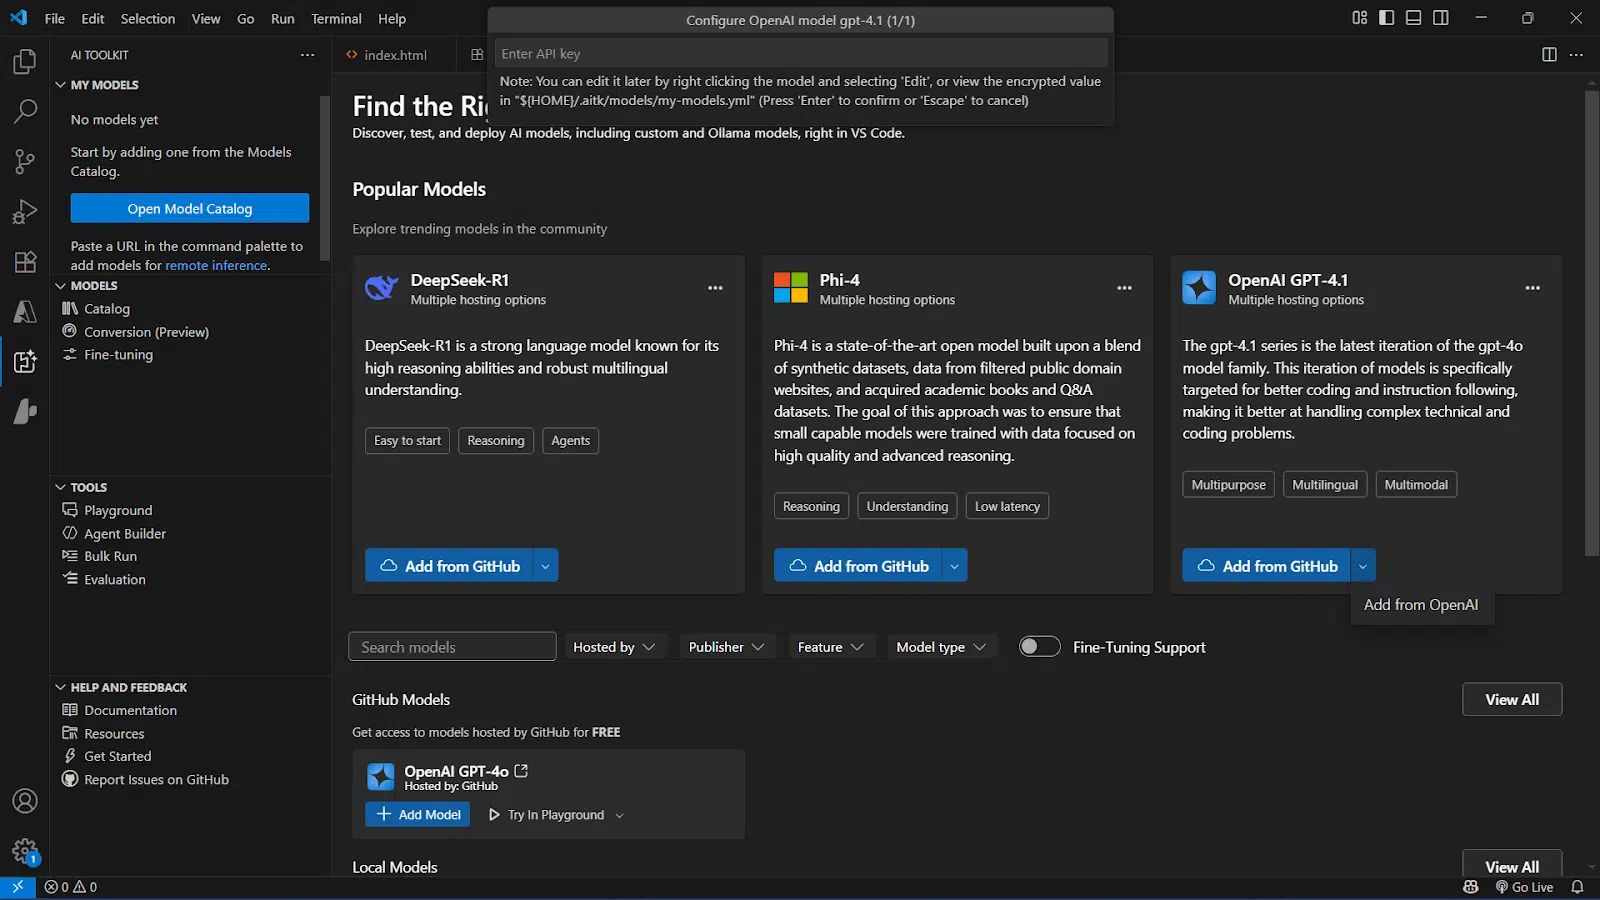
That’s it, you’re now connected to GPT-4.
If you’d rather use a free model or a local one, you can install Ollama and select from supported open-source models like Mistral or LLaMA. The extension guides you through this if you choose one of those models.
Step 4: Test Your First Prompt in the Playground
- Click on Playground in the AI Toolkit panel.
- You’ll see a prompt box where you can type your input.
- Write something simple like:
“Explain how token limits affect language models.” - Hit Submit or press Enter.
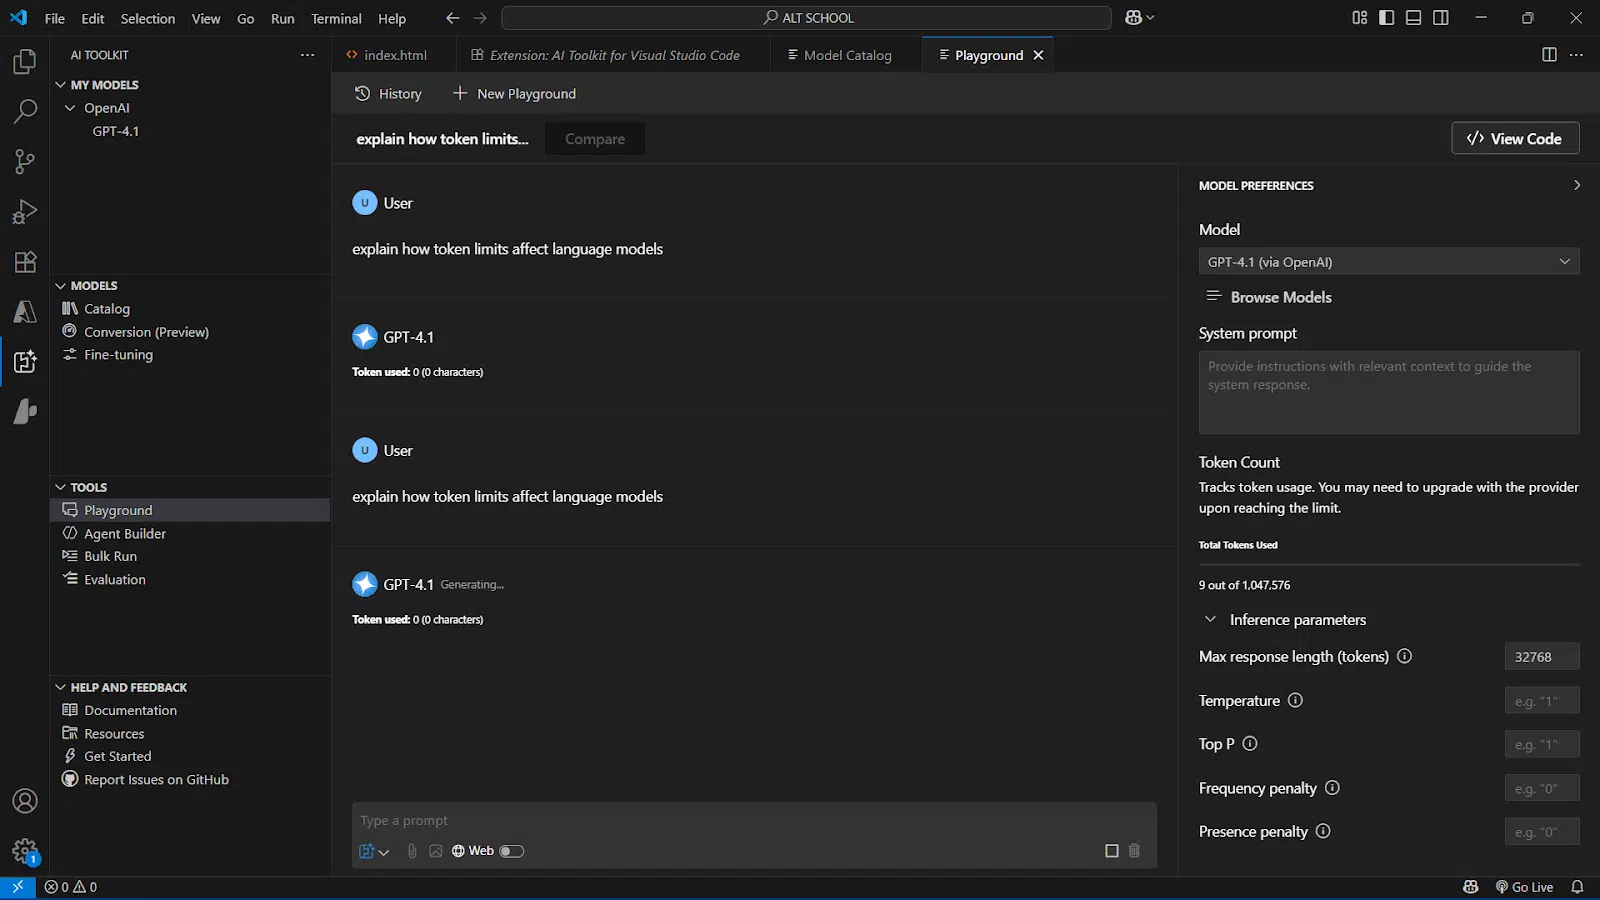
You’ll get a response in a few seconds. You can adjust sliders for:
- Temperature (for randomness)
- Top-p (controls diversity)
- Max tokens (controls length)
Try tweaking these settings and rerun the prompt to see how the model responds differently.
Step 5: explore more tools (optional)
If you’re comfortable so far, here are two other things you can try:
- Agent Builder: Helps you design AI workflows with structured tasks or multi-step logic.
- Bulk Run: Lets you run the same set of prompts across different models to compare their outputs side by side.
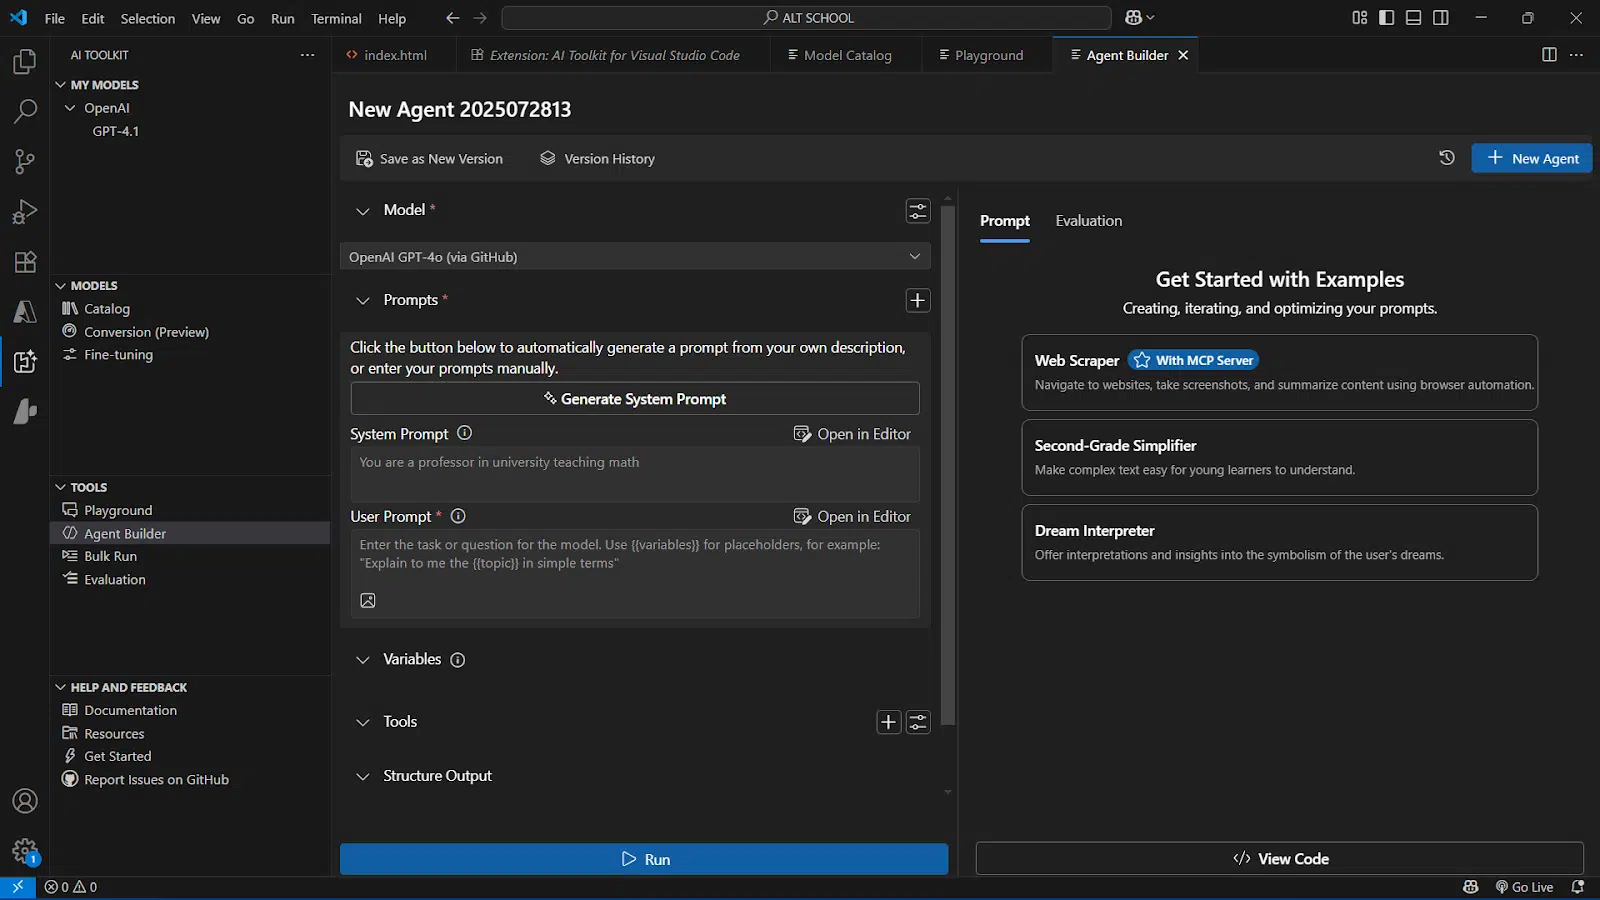
You don’t need to try these right away, but they’re worth exploring once you get a feel for the Playground. That’s it. You’ve installed the Toolkit, connected a model, and tested a prompt, all inside VS Code.
If I had this breakdown when I first installed it, I would’ve saved a lot of back-and-forth. Hopefully, this gets you up and running without confusion.
How VS Code AI Extension compares to other ai tools
If you’ve used tools like GitHub Copilot, Cursor, or even Tabnine, you might wonder how this one fits in. I’ve tried most of those, and here’s how the AI Toolkit is different.
- It’s not focused on code suggestions
Copilot is great for helping you write code faster. But the AI Toolkit doesn’t jump into your code editor with suggestions. Instead, it gives you control over models, prompts, and workflows. You’re not asking “what should I type next?”, you’re building AI-powered features yourself.
- It supports multiple models, not just one
With Copilot or ChatGPT, you’re limited to one provider. The AI Toolkit lets you connect to GPT-4, Claude, Gemini, Phi-3, and even run local models. You can switch between them or test prompts side-by-side, which is something most tools don’t offer.
- It’s more than a chatbot
You’re not just chatting with a model here. You can build multi-step agents, fine-tune small models, and deploy them into actual products. It’s designed for people building tools with AI, not just chatting for fun or quick answers.
- Local-first and cloud-friendly
Some tools are either too cloud-dependent or too clunky for local development. This toolkit strikes a balance. If I want to run a small model locally using Ollama, I can. If I want to deploy to Azure later, it’s also built in.
Most AI tools help you use models. The AI Toolkit helps you build with them. If you’re prototyping a feature, building a chatbot, or testing model behavior at scale, this one’s much better suited for the job.
Real use cases for the ai toolkit
The more I explored the AI Toolkit, the more I saw how flexible it is. Here are a few use cases where it really works:
1. Building a custom chatbot with memory
I wanted to create a chatbot that could answer questions about a document and remember context over multiple messages. Using the Agent Builder, I defined steps for the model to:
- Receive input
- Search a file
- Respond using that context
- Store and reuse information
With a few tweaks, I had a basic memory-based chatbot running—all from inside VS Code.
2. Comparing model outputs for a prompt library
I had a set of prompts for content summarization and wanted to see which model gave the most accurate and useful results. Using the Bulk Run tool, I tested the same prompts across GPT-4, Claude, and Phi-3 in one go. The side-by-side results helped me choose the best model for my use case without switching between tools or tabs.
3. Prototyping a document assistant with a local model
Just to see how far I could go offline, I used Ollama to load a local model like Mistral. I connected it in the Model Catalog, tested prompts in the Playground, and even fine-tuned it with custom examples. This setup worked well for lightweight, privacy-sensitive projects, no internet connection needed.
4. Evaluating prompt variations for product descriptions
For a small e-commerce idea, I wrote five different prompts to generate product descriptions and ran them through three different models. The Evaluation tool gave me cost, speed, and consistency insights that I wouldn’t get by eyeballing it. It helped me lock in the best-performing prompt for production use.
5. fine-tuning a model for a narrow task
I had a dataset of support ticket summaries and responses. Using the fine-tuning interface, I trained a version of Phi-3 to provide more focused and concise replies. The process didn’t require custom scripts, just a structured JSON file and a few guided steps in the extension.
Each of these use cases started with a single model in the Playground and scaled into more structured workflows. That’s the strength of this toolkit: it meets you where you are, then gives you room to grow.
Limitations and things to keep in mind
As useful as the Visual Code AI Toolkit is, there are a few things I ran into that are worth knowing up front. It’s not flawless, and depending on your setup, you might hit some friction.
- You need your own API keys: The extension doesn’t come with free access to models like GPT-4 or Claude. You’ll need to bring your own API keys from providers like OpenAI, Anthropic, or Google. That means setting up accounts, managing usage limits, and possibly dealing with billing, even for testing.
- Fine-tuning only works with small models: You can’t fine-tune GPT-4 or Claude directly inside the Toolkit. The fine-tuning feature only supports smaller, open-source models like Phi-3 or Mistral. That’s still useful, but it’s not a full replacement for more advanced training workflows.
- Local model setup can be tricky: Running models locally via Ollama or ONNX gives you more control, but it does take some setup. You’ll need to install those tools separately, and performance depends on your system’s hardware. If you’re on a basic laptop, don’t expect lightning-fast inference speeds.
- Deployment isn’t one-click (yet): While there are deployment options, they still require some manual work. Exporting agents or hooking up to a real product environment, especially for web apps or APIs, takes configuration. The toolkit helps, but don’t expect instant production deployment.
- It’s still evolving: Because this is a relatively new extension, some features feel a bit raw. I noticed minor UI quirks and the occasional bug when switching between tabs or models. Nothing show-stopping, but it’s clear that Microsoft is still building it out.
The AI Toolkit gives you a lot of power in one place, but it’s not beginner-proof or fully automated. You’ll get the most out of it if you’re comfortable with API keys, model concepts, and a bit of trial-and-error.
Final Thoughts
After spending time with the AI Toolkit for Visual Studio Code, I can honestly say it’s one of the most useful AI extensions I’ve tried. If you’re looking to build with AI, not just play with prompts.
It doesn’t try to write your code for you. Instead, it gives you the tools to:
- Explore and compare models
- Design structured workflows
- Fine-tune and evaluate outputs
- Build AI-powered apps inside the same editor you already use
It’s not perfect, there’s still a setup involved, and some features depend on external tools or APIs, but it gets a lot right. Most importantly, it cuts down the friction between idea and implementation. That’s a big deal when you’re experimenting or building fast.
If you’ve been curious about AI but don’t want to leave VS Code to get started, this is worth installing.
Let me know if you’ve tried the AI Toolkit already or if you plan to. What model are you experimenting with? What kind of AI project are you building?
Drop your thoughts or questions in the comments, I’d love to hear how you’re using it.
You may also like:
| VS Code vs Cursor | Cursor vs Replit vs Bolt |
| Replit vs V0 | Cursor AI alternatives |
| Replit vs Bolt | Cursor vs GitHub Copilot |


