Ever picked up a new iPhone and stared blankly at an empty contacts list? Losing access to all those numbers can be frustrating. Luckily, if you’ve been using Gmail, getting every contact onto your iPhone is easier than you might think. Let’s make sure you never miss a call or message again.
In this guide, you will learn:
- How to sync Gmail contacts directly through your iPhone.
- How to export contacts from Gmail and import them via iCloud.
- How to use third-party apps to make the transfer effortless.
- Tips for keeping your contacts updated automatically.
Quick-Glance: 3 easy methods to import Gmail contacts to iPhone
| Method | Best For | Time Needed | Difficulty |
| Sync via iPhone Settings | Quick setup, keeps contacts updated automatically | 5 minutes | Easy |
| Export from Gmail + Import via iCloud | Large contact lists, one-time transfer | 10–15 minutes | Moderate |
| Third-Party App | Users who want a simple, guided process | 5–10 minutes | Easy |
Method 1: Sync Gmail contacts directly through iPhone settings
If you want a way to have all your Gmail contacts show up on your iPhone and stay updated automatically, this method is the easiest. The iPhone’s built-in settings let you link your Gmail account, and everything syncs without extra tools.
Step 1: Add your Gmail account to your iPhone
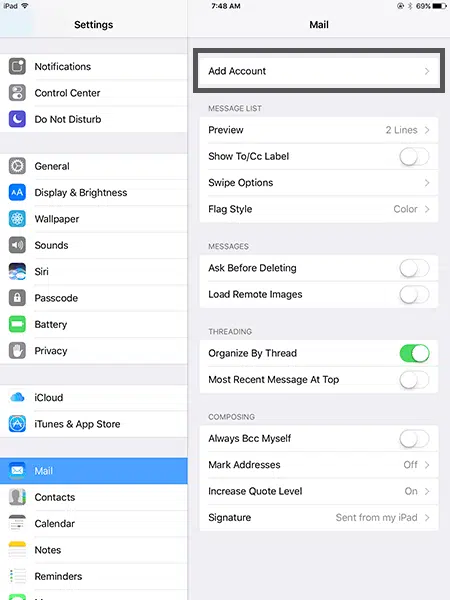
- Open the Settings app on your iPhone.
- Scroll down and tap Mail, then Accounts.
- Select Add Account and tap Google.
- Enter your Gmail email address and password, and follow the prompts to sign in.
Step 2: Enable contacts syncing
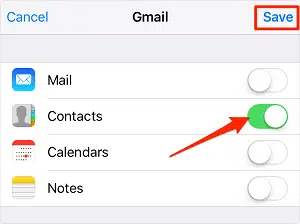
Once your Gmail account is added, you’ll see a list of items you can sync: Mail, Contacts, Calendars, and Notes. Make sure Contacts is turned on. This is what allows your Gmail contacts to appear in the iPhone’s Contacts app.
Step 3: Check your Contacts app
After enabling syncing, open the Contacts app. Your Gmail contacts should appear shortly. Depending on the number of contacts you have, it may take a few minutes for everything to show up.
Step 4: Set Gmail as the default account (optional but helpful)
If you frequently add new contacts and want them saved directly to Gmail (so they sync across devices), go back to Settings > Contacts > Default Account, then select your Gmail account. This way, every new contact you add to your iPhone automatically appears in Gmail.
Why this method works well
- Automatic updates: Any changes you make in Gmail or on your iPhone reflect across both platforms.
- No extra apps needed: Everything is handled natively by iOS.
- Simple setup: Once you connect your account, it’s mostly hands-off.
Tips for a smooth experience
- Make sure your iPhone is connected to Wi-Fi during the initial sync—it can take a few minutes if you have a large contact list.
- If some contacts don’t appear immediately, try toggling Contacts off and on again in your Gmail account settings on your iPhone.
- Double-check Gmail labels—only contacts under “My Contacts” will sync, so clean up any stray or duplicate contacts in Gmail first.
With this method, you get a hands-off, reliable way to keep all your contacts up to date, making it ideal for everyday use.
Method 2: Export Gmail contacts and import via iCloud
If you have a large number of contacts or prefer a one-time transfer over continuous syncing, exporting your Gmail contacts and importing them through iCloud is a reliable approach. It gives you more control and works even if you don’t want to link your Gmail account directly to your iPhone.
Step 1: Export contacts from Gmail
- Open Gmail on a web browser and click the Google Apps icon (the 9-dot grid in the top-right corner), then select Contacts.
- In the Contacts page, click Export on the left-hand menu.
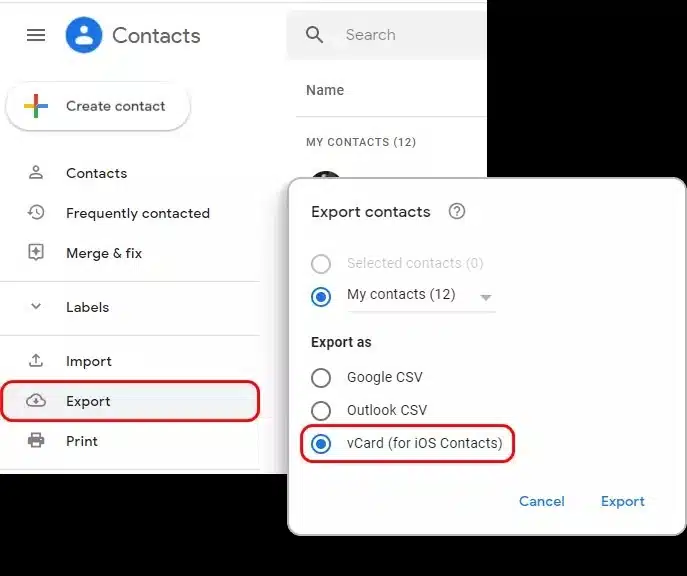
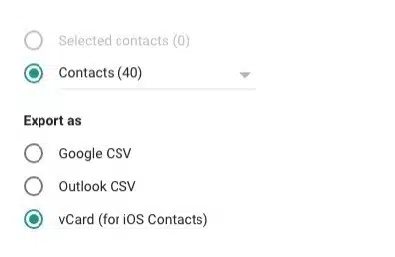
- Choose Selected contacts or All contacts, depending on what you want to transfer.
- For iPhone compatibility, select the vCard (for iOS Contacts) format and click Export. This will download a .vcf file to your computer.
Step 2: Import contacts to iCloud
- Open a browser and go to iCloud.com. Sign in with your Apple ID.
- Click on Contacts, then select the gear icon in the bottom-left corner and choose Import vCard.
- Select the .vcf file you exported from Gmail. iCloud will automatically add all the contacts from the file to your account.
Step 3: Sync iCloud contacts with your iPhone
- On your iPhone, go to Settings > [your name] > iCloud.
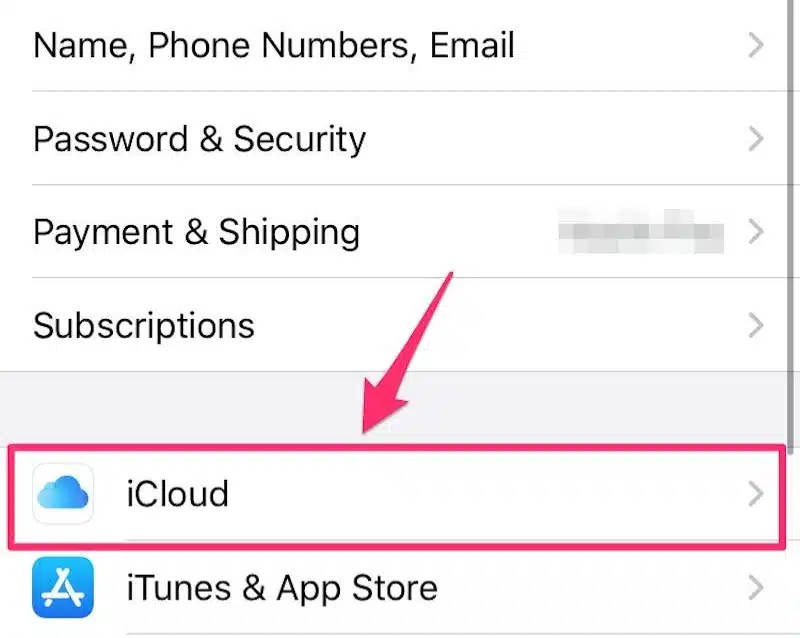
- Make sure Contacts is turned on. This will pull all the imported contacts into your iPhone’s Contacts app.
Why this method works well
- One-time transfer: Ideal if you don’t want ongoing sync or if you’re switching devices.
- Organized import: You can clean up contacts in Gmail before exporting, avoiding duplicates or outdated numbers.
- Full control: You decide exactly which contacts go to your iPhone.
Tips for a smooth experience
- Before exporting, remove duplicates in Gmail to avoid clutter. Gmail has a built-in Merge & fix option in Contacts that makes this easy.
- Keep your iCloud updated, and if you later add new contacts, make sure to repeat the export/import process or consider Method 1 for automatic syncing.
- Check that your Apple ID on iCloud matches the one on your iPhone; otherwise, contacts won’t appear.
Using this method gives you a clean, controlled way to bring all your Gmail contacts to your iPhone without linking accounts, making it perfect for users who prefer a one-time, thorough transfer.
Method 3: Use a third-party App to transfer contacts
If you want a simple, guided process without fiddling with Gmail exports or iPhone settings, a third-party app can be a lifesaver. These apps are designed to handle the heavy lifting, letting you move contacts quickly and accurately, especially if you have a large list.
Step 1: Choose a reliable app
There are several trusted apps for transferring contacts, such as My Contacts Backup, SA Contacts, or Contacts Sync. Download the one that best fits your needs from the App Store. Free versions often work fine for basic transfers, while premium versions may offer extra features like scheduled syncing or duplicate removal.
Step 2: Connect your Gmail account (if required)
Some apps will ask you to sign in to your Gmail account. This allows them to access your contacts safely. Don’t worry, reputable apps use secure connections and never store your data on third-party servers. Always check app reviews to make sure it’s trustworthy.
Step 3: Back up your Gmail contacts
Once signed in, follow the app’s instructions to back up your Gmail contacts. Most apps create a .vcf backup file, either on your device or in a cloud location. This step ensures you have a copy of all your contacts before moving them to your iPhone.
Step 4: Import contacts to your iPhone
With the backup ready, the app will guide you through importing contacts directly into your iPhone’s Contacts app. Some apps even let you do this wirelessly, no computer required. After the import, open your Contacts app to make sure all numbers, emails, and details have been transferred correctly.
Why this method works well
- Quick and straightforward: The app handles the technical steps for you.
- Great for large lists: If you have hundreds or thousands of contacts, this method saves time.
- Extra features: Many apps offer duplicate removal, scheduled backups, and cross-device syncing.
Tips for a smooth experience
- Always read reviews before choosing an app to ensure it’s reliable and secure.
- Keep a backup of your Gmail contacts just in case anything goes wrong during import.
- If you plan to regularly update contacts between Gmail and iPhone, pick an app that offers automatic sync to avoid repeating the process.
Using a third-party app is perfect for anyone who wants a guided, low-effort way to transfer contacts. It’s especially handy if you’re not comfortable navigating export/import processes or just want everything done in a few taps.
Tips for keeping your contacts updated
Once you’ve successfully imported your Gmail contacts to your iPhone, the last thing you want is for them to get outdated or scattered. Here are some practical tips to keep your contacts organized and always current:
- Stick to one primary source for contacts: Whether it’s Gmail or iCloud, try to choose one main account for storing contacts. This avoids duplicates and ensures any new contact you add is automatically synced across your devices.
- Enable automatic syncing: If you used Method 1 (iPhone settings sync), your contacts will update automatically. Any changes in Gmail—like new numbers, updated emails, or corrected details—will reflect on your iPhone without extra effort.
- Regularly clean up duplicates: Even with syncing, duplicates can appear over time. Both Gmail and iCloud offer tools to merge or remove duplicates. Spend a few minutes every few months to tidy up, so your contact list stays neat and easy to navigate.
- Backup your contacts: It’s always a good idea to back up your contacts periodically. You can use iCloud backups, Gmail exports, or even third-party apps to keep a safe copy. This ensures you never lose important numbers in case of a device change or accidental deletion.
- Label and organize contacts: Using labels in Gmail or groups in iCloud helps you quickly find contacts when you need them. For example, create groups for family, work, or friends. This is especially handy if your contact list is extensive.
- Keep your info consistent: Make sure names, phone numbers, and emails are accurate across all accounts. Consistency prevents confusion when searching or sharing contacts.
Key takeaways
Importing your Gmail contacts to your iPhone doesn’t have to be complicated. Here’s a quick recap:
- Method 1: Sync via iPhone Settings – Best for ongoing updates and hands-off syncing. Quick, easy, and automatic.
- Method 2: Export via Gmail + Import via iCloud – Perfect for one-time transfers or large contact lists. Gives full control over what moves to your iPhone.
- Method 3: Third-Party App – Ideal if you want a guided, simple process with extra features like duplicate removal or scheduled syncs.
- Keep your contacts updated – Stick to one source, enable automatic syncing if possible, clean duplicates, and back up regularly.
By following these methods and tips, you can ensure that every number, email, and important contact detail is always at your fingertips. No more missing calls, lost numbers, or messy contact lists—just smooth, seamless communication between your Gmail and iPhone.
Also read:
How to delete text messages on iPhone for both sides (2025 guide)
I found the best fixes to stop random vibrations on your iPhone and Android
How to allow pop-ups on iPhone
‘No location found’ vs. ‘location not available’ on iPhone: what’s the difference?

