If your Nintendo Switch is running out of space and spamming you with that “insufficient storage” tagline, don’t fret. At this point, it happens to everyone. The problem is that game installation data continues to increase in size, and your console only has 32GB of storage.
Whether you have the original Switch, Switch Lite, or Switch OLED, they all function similarly for managing storage. And have tools to help you free up space without losing your games forever.
This guide shows you exactly how to manage your Switch storage. We’ll walk through each step with clear instructions. You’ll learn how to free up space, restore games later, and keep your system organized. The process is simple once you know where to look.
No more “insufficient storage” errors stopping you from playing new games.
Let’s fix your storage problem and get back to gaming.
What’s the difference between archiving and deleting games on Nintendo Switch, Switch Lite, and Switch OLED?
The game management process is identical across all Nintendo Switch models (the original Switch, Switch Lite, and Switch OLED), since they all run the same system software with identical menus and storage management features.
When you archive games, this is what happens:
Archiving removes the game’s main files while preserving essential data. Your save data remains completely intact on the console, including all your progress, character customizations, achievements, and in-game settings. The game’s icon stays visible on your home screen with a small cloud symbol indicating it’s archived rather than installed.
Your playtime statistics and recent activity records remain unchanged, so the game continues to appear in your play history with accurate time tracking. Any downloadable content (DLC) you purchase is automatically archived alongside the base game. When you eventually re-download the game, both the main game and all DLCs will be restored together without requiring separate downloads.
The game maintains its position in your library organization, and your Nintendo eShop purchase record stays active, meaning you won’t need to search through your entire purchase history to find it later. Screenshots and video captures from that specific game remain unchanged in your album. If you have Nintendo Switch Online, your cloud saves stay synchronized, providing an additional backup layer.
Most importantly, archived games can be restored directly from your home screen with a simple selection (which you’ll see as we proceed), so you don’t need to navigate through the eShop or remember the exact game title.
When you delete games, this is what happens:
Deleting completely removes the game from your system, including the game’s icon from your home screen and library. This method eliminates all traces of the game’s presence on your console’s interface.
The critical difference lies in safe data handling. Deleting removes all local save data permanently unless you have Nintendo Switch Online cloud saves enabled and the specific game supports cloud save functionality. Even with cloud saves, there’s a risk if your most recent progress hasn’t synced before deletion.
The game disappears entirely from your recently played list, activity feed, and home screen organization. Your playtime statistics for that game become inaccessible through the standard interface, though they may remain in your overall profile data.
To restore deleted games, you have to go through the Nintendo eShop, access your account profile, and locate the game in your “Redownload” section (I wrote about a detailed process; you’ll find it as you read on). This requires remembering the game title or browsing through potentially years of purchase history, which can sometimes fail.
Conclusively, unlike archiving, deletion creates a complete break between you and the game until you actively seek it out for reinstallation.
Does archiving and deleting games on Nintendo Switch, Switch Lite, and Switch OLED affect storage the same way?
Both archiving and deleting games free up virtually identical amounts of storage space on all Nintendo Switch models. This happens because game files constitute the overwhelming majority of storage usage, typically ranging from hundreds of megabytes to over 30 gigabytes per game.
When you archive a game, the system removes all major game files, including executable code, graphics assets, audio files, and video content. The only data remaining consists of save files, which typically occupy just a few megabytes regardless of how much you’ve played. A 15GB game will free up approximately 14.99GB of space when archived, with only tiny save files remaining.
Deleting games removes these duplicate major files plus the minimal save data. The storage space difference between archiving and deleting is negligible, usually less than 10MB, even for games with extensive save data.
If you use an external microSD card, you’ll see identical space recovery regardless of your chosen method.
So what are the long-term considerations for both methods?
While both methods immediately free up the same space, they differ in ongoing storage management. Archived games maintain small placeholders that help you track your owned library without consuming meaningful space. Over time, these minimal save files don’t accumulate to create storage pressure.
Deleted games leave no storage footprint whatsoever, providing the cleanest possible storage state. However, this approach requires more effort to track and reinstall games later.
When should you choose each method?
It’s really simple. Just choose archiving a game when you’re:
- Temporarily removing games to make space for new purchases,
- Unsure about returning to a game, and or:
- Want to maintain an organized visual library
This method works particularly well for seasonal games, titles you play periodically, or games with significant time investment that you might return to later.
On the other hand,
Go for deleting a game when you’re certain you won’t replay this game, when you want to completely declutter your interface, or when you’re dealing with games you regret purchasing, and don’t want in your face anymore. This decision suits users who prefer minimalist interfaces and are confident about their gaming preferences.
Great. Let’s head into the steps you’ve been waiting for.
How to archive games on Nintendo Switch, Switch Lite, and Switch OLED (complete step-by-step process for you)
Method 1: Archive from Home Screen
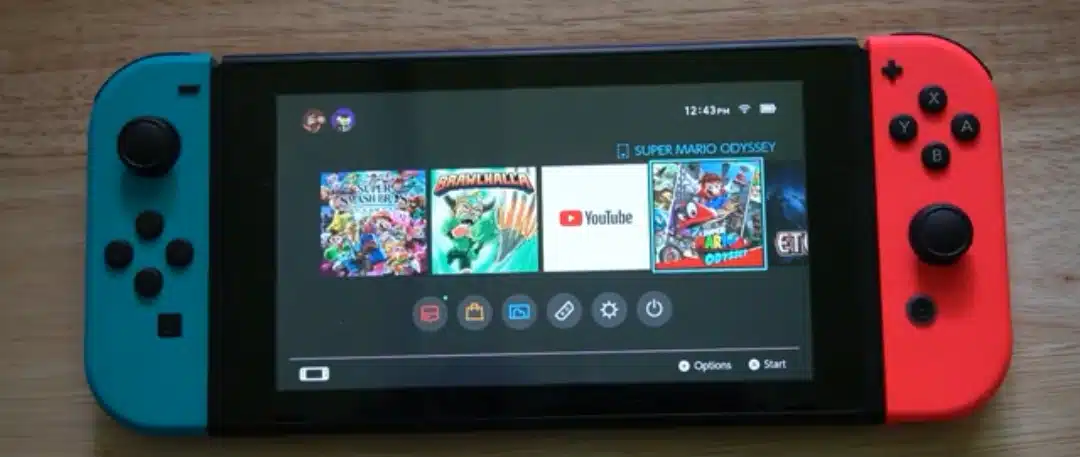
Image sources: YouTube
- Step 1: Tap or select the All Software icon at the right end of the game grid.
- The All Software icon appears as a grid symbol with a plus sign, typically positioned after your most recently played games. If the game you want to archive appears directly on your home screen (among the 12 most recently accessed titles), you can select it directly without going through the All Software menu.
- Step 2: With a game now selected, tap or press the physical Options button, then tap or select Manage Software listed on the pop-up screen.
- The Options button is the small “+” button located on the right Joy-Con controller. When you press this button while highlighting a game, a context menu with several options appears. Select “Manage Software” using the A button. This opens the software management interface specific to that game.
- Step 3: Choose Archive Software. To confirm, tap or select Archive when prompted.
- The Manage Software menu has several options, including “Archive Software” near the top. Select this option, and the system will present a confirmation dialog explaining that the software will be archived, but the saved data will be preserved. Confirm by selecting “Archive” in the dialog box.
Method 2: Archive through System Settings
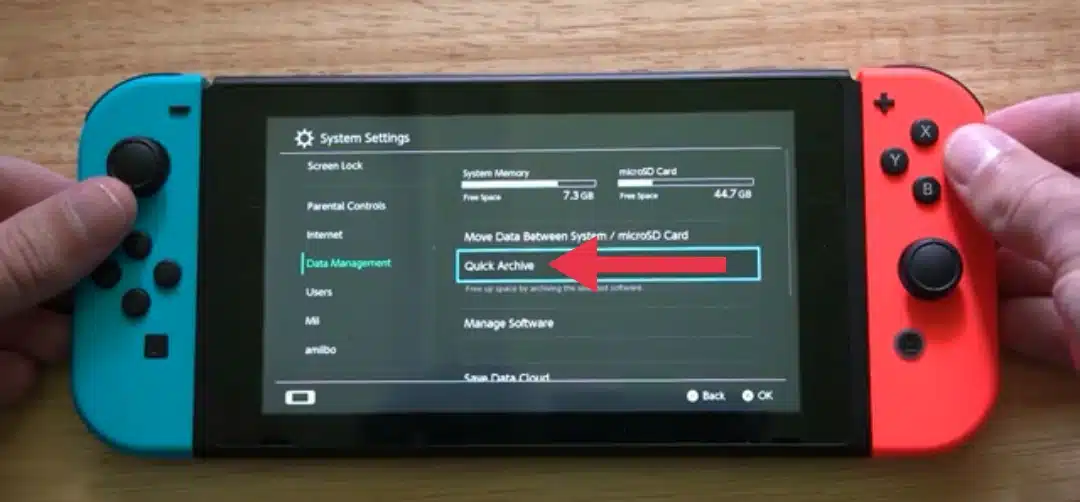
Before we head into the steps, I’d like you to know that you can possibly archive multiple games here simultaneously by tapping on Quick Archive under Data Management.
The Quick Archive feature allows batch processing of games for archiving. This tool is handy when you need to quickly free up significant storage space or when preparing your Switch for major new game installations.
Credit: YouTube
- Step 1: Select System Settings.
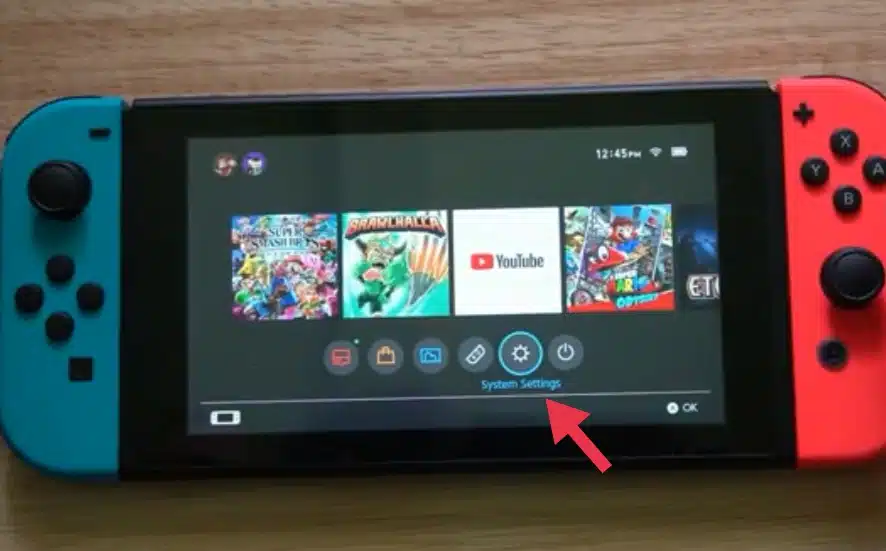
Image source: YouTube
- Navigate to the System Settings by selecting the gear icon from your home screen. This opens the main settings interface, where you can manage various aspects of your Nintendo Switch.
- Step 2: You’ll find Data Management on the left side of the screen. Tap that option.
- In the System Settings menu, scroll down the left sidebar until you locate “Data Management.” This section contains all storage-related options and tools for managing your console’s memory usage.
Credit: YouTube
- Step 3: You should now see the Manage Software feature.
Image source: YouTube
- The Manage Software interface displays all your installed games in a list format, showing each game’s file size. This view helps you identify which games consume the most storage space and which use the least, making it easier to decide what to archive for maximum space recovery.
- Step 4: While looking at the list, you can choose to archive the game(s).
Credit: YouTube
- Select any game from the list to open its management options. Choose “Archive Software” from the available options, then confirm your choice in the subsequent dialog box.
So how do you undo these actions? Let’s find out.
How to re-download archived games on Nintendo Switch, Switch Lite, and Switch OLED
The process of reinstalling archived games differs significantly from downloading completely deleted titles (you’ll see that in subsequent subheadings). Archived games only offer multiple convenient restoration methods. And you get it done like this:
- Step 1: Find the All Software tab located on the home screen.
Image source:; YouTube
- Archived games remain visible on your home screen with a distinctive cloud icon indicating their archived status (and a visual reminder that the game needs to be downloaded.
Credit: YouTube
Simply select the archived game directly from your home screen or through the All Software menu.
- Step 2: Once you choose your game, confirm your choice by simply pushing the download button a second time.
- When you select an archived game, the system immediately begins the download process. You’ll see a progress bar indicating the download status, and the cloud icon transforms into a download progress indicator. Press the A button again if prompted to confirm the download initiation.
How to delete games on Nintendo Switch, Switch Lite, and Switch OLED (quick and easy step-by-step methods)
Method 1: Delete games on Nintendo Switch, Switch Lite, and Switch OLED from the Home Screen
- Step 1: Tap or select the All Software icon located on the right end of the game grid.
- Begin by locating the game you wish to delete. It will appear directly on the home screen if it’s among your 12 most recently played games. Otherwise, select the All Software icon (the grid with a plus symbol) to access your complete library.
- Step 2: With a game now selected, tap or press the physical Options button.
- Press the Options (+) button on your right Joy-Con while highlighting the desired game. This action opens a context menu with various management options.
- Step 3: Use the A button to select “Manage Software” and proceed to the detailed management interface.
- Scroll down to find the “Delete Software” option in the Manage Software menu. This choice is typically located below the Archive option. When you select Delete Software, the system displays a warning dialog explaining that both the software and save data will be removed unless cloud saves are enabled. Carefully read this warning before confirming with “Delete.”
Method 2: Delete games on Nintendo Switch through System Settings
- Step 1: Select System Settings.
- Access System Settings by selecting the gear icon from your Nintendo Switch home screen. This opens the comprehensive settings menu for your console.
- Step 2: Along the left side of the screen, you’ll find Data Management. Tap that option.
- Go to “Data Management” in the left sidebar of the System Settings menu. This section centralizes all storage management tools and provides detailed information about your console’s memory usage.
- Step 3: The Manage Software feature will now pop up. This tool catalogs, tracks, and groups your installed games to measure storage usage.
- The Manage Software interface presents a comprehensive list of all installed software, organized by storage consumption. Based on their storage impact, this view lets you decide which games to remove.
- Step 4: Select the game you want to delete from the list.
- Choose the game you wish to remove completely from your system. The interface shows each game’s file size, helping you understand how much space you’ll recover through deletion.
- Step 5: Choose “Delete Software” and confirm the action.
Image source: YouTube
- Select “Delete Software” from the available options. The system will present a final confirmation dialog warning about the permanent removal of both game data and save data (unless protected by cloud saves).
Credit: YouTube
How to re-download deleted Games on Nintendo Switch, Switch Lite, and Switch OLED
- Step 1: Tap or select the Nintendo eShop icon.
Image source: YouTube
- You must access the Nintendo eShop to locate your purchase history for completely deleted games. To launch the eShop application, select the orange shopping bag icon from your home screen.
- Step 2: Tap or select your account avatar in the top-right corner.
- Your account avatar appears as a circular icon in the upper-right corner of the eShop interface. Selecting this icon opens your account management menu with various profile and purchase options.
- Step 3: Scroll down and tap or select Redownload to view your library of games not currently installed on the console.
Credit: YouTube
- In the account menu, locate the “Redownload” option, which provides access to your complete purchase history. This section displays all digital games you’ve purchased but aren’t currently installed on your console.
- Step 4: Tap or select the Cloud icon to the right of the game you want to install.
Image source: YouTube
- Browse through your purchase history to find the deleted game. On the right side of each unavailable game, there is a cloud download icon. Select this icon to begin the re-download process.
And that’s it. But before we wrap up, let’s look at some tips to help you lighten your storage load.
Tips to help you manage your Storage on Nintendo Switch, Switch Lite, and Switch OLED better
Managing storage on your Nintendo Switch, Switch Lite, or Switch OLED goes beyond simply archiving or deleting games. You need a structured approach if you want smoother performance and fewer interruptions. That means keeping track of your library, planning for new purchases, and strategically using your storage tools. The following tips will help you stay in control of your storage space.
1. Be strategic about which games you remove
Not every game in your library deserves to stay installed. And the Switch shows you the last time you played each title when you hover over it, which is a simple but helpful guide. So, games you haven’t touched in more than six months, especially those that take up a lot of space, are good picks for archiving. Story-driven single-player titles you’ve already completed are another smart choice, since they free up space without disrupting your gaming routine.
Additionally, think about seasonal habits, too. Sports titles tied to annual cycles, holiday-themed games, or ones you only revisit during certain months can safely be archived until their season returns. On the other hand, multiplayer games, racing titles, and fighting games you return to frequently should stay installed for quick access.
2. Monitor your storage regularly
The Switch has built-in tools that make storage monitoring straightforward. Go to System Settings, Data Management, then Manage Software, and you’ll see your games listed by storage usage. This lets you identify which games are taking up the most space.
Make it a habit to check storage at least once a month, especially before buying or downloading new games. Pay attention to titles that have grown in size due to updates, as some games expand considerably over time. If you constantly run out of room, consider upgrading to a high-capacity microSD card instead of juggling a limited internal drive.
3. Optimize how you use a microSD card
Your Switch prioritizes internal storage for system files and saves data, while game installations usually go to your microSD card. This means your saves are safe even if you replace or upgrade the card.
When buying a microSD card, choose one with at least a Class 10 speed rating to avoid slow loading times. Slower cards can cause noticeable delays, especially in games that stream assets frequently. Keep your most-played titles on the internal storage for the fastest access, and use the microSD card for larger single-player games, archived titles, or those you don’t need immediate access to.
4. Manage Updates and DLC wisely
Game updates can sometimes double the size of an original install. Before downloading an update, check whether you’re still actively playing that title. If not, you may want to hold off until you’re ready to return.
The same logic applies to downloadable content (DLC). Only install what you plan to use right away. Many games allow you to download DLC in parts, so you don’t have to commit to installing an entire season pass at once. Selective downloading keeps your storage more flexible.
5. Use Quick Archive for bulk cleanups
When you need to free space quickly, say, before installing a major new release, use the Quick Archive option under Data Management. This tool identifies less-played games and lets you archive multiple titles at once.
It’s also smart to prepare ahead of time. Review your current library before buying a large game and archive anything you don’t expect to play soon. That way, you won’t be caught scrambling for space mid-download.
6. Keep your library organized
Think of your Switch library like a bookshelf with limited space. A good strategy is to keep around 8–12 active games that cover different genres and moods. Rotate titles in and out as you finish them or as your interests change.
This “seasonal rotation” helps balance variety with practicality. The archived games would never be lost, but simply stored away until you want them again. Adopting this mindset makes storage decisions easier and less stressful.
7. Double-check cloud saves before archiving
Before archiving or deleting a game, verify that your progress is backed up by going to System Settings, Data Management, then Save Data Cloud to check your sync status. Not all games support cloud saves, so in some cases, archiving may be safer than deleting.
If you subscribe to Nintendo Switch Online, enable automatic cloud save uploads. This ensures your progress is protected, even for games you don’t play often. Having this safely backed gives you confidence when making tough storage decisions.
Rounding up,
Archiving and deleting both effectively solve Nintendo Switch storage problems. Both methods free up the same amount of space across all Switch models. Archiving protects saved data and makes game restoration easy from your home screen. Deleting removes everything but requires eShop navigation to reinstall games.
Choose archiving when you might replay games or want to protect progress. Go for deleting when you’re finished with games permanently and prefer a clean interface. But always check your cloud save status before deleting to avoid losing progress.
Regular storage maintenance prevents last-minute cleanup when installing new games. Monitor which games use the most space through System Settings. When needed, use Quick Archive for multiple games.
If you ask me, I’d tell you the best approach combines both methods strategically. Archive games you might return to and delete games you’ve completed or disliked. This keeps your library organized while maximizing available storage for new purchases and downloads.
So there you have it!
Frequently Asked Questions (FAQs)
Will I lose my save data if I archive a game?
- No, archiving preserves all your save data completely. Archiving deletes a game’s data but leaves its icon in your library while maintaining your progress, achievements, and game settings. When you re-download the archived game, all your save data returns exactly as you left it.
Will I lose my save data if I delete a game?
- Yes, deleting removes local save data unless you have Nintendo Switch, Switch Lite, and Switch OLED’s online cloud saves enabled, and the specific game supports cloud save functionality. Deleting software completely removes the game data and the game’s icon from your Switch. Always verify your cloud save status before deleting games with significant progress.
Can I archive games I bought physically?
- No, only digital games downloaded to your system can be archived. Physical cartridge games don’t install to your internal storage in the same way, so the archive function doesn’t apply to them. However, data saved for physical games remains in your system and doesn’t require storage management.
Do archived games take up any storage space?
- Archived games use minimal storage space, only preserving small save data files (typically a few megabytes) and the game icon. Most of the game’s files are removed during archiving, freeing up virtually all the initial storage space the game occupied.
Will I have to pay again to re-download an archived game?
- No, your purchase is permanently tied to your Nintendo account. Archived games can be re-downloaded at any time without additional payment. Your digital library remains accessible through your account regardless of installation status.
Can I archive multiple games at once?
- It’s possible to archive multiple games at the same time. Users can click on Quick Archive under Data Management. This batch processing feature helps efficiently manage storage when you need to free up significant space quickly.
What happens to DLC when I archive the main game?
- DLC is automatically archived alongside the base game. When you re-download the archived game, all previously downloaded DLC content is restored with the main game installation, maintaining your complete game experience.
How do I know which games are taking up the most space?
- This tool catalogs, tracks, and groups your installed games to measure storage usage. Games are generally organized from those that use the most space to those that use the least. Navigate to System Settings, Data Management, and Manage Software to view detailed storage usage for each installed game.
Can I archive games while they’re running?
- No, you must close a game completely before archiving or deleting it. The Nintendo Switch prevents modification of active software files, so ensure the game is fully closed and not suspended in the background before attempting storage management actions.
Is there a limit to the number of games I can have archived?
- Archived games have no practical limit, as they consume minimal storage space to save data. Your home screen and All Software menu can display extensive libraries of archived games without performance impact, making archiving a scalable long-term storage solution.

